Wednesday 30 November 2011

Anyway!.....about the roses

I'm sure that many of you who are creative will understand how its easy to get a little unfocused where there are so many things you want to do and so many projects on the go.
I did start out some months ago with the intention to work for some time exploring and experimenting through a theme, 'Roses', I did some experimenting, and shared some of what I did, 
 

and some I didn't manage to show....

playing around with tyvek


and metal


using the image from stitched paper rose I drew an outline on a metal paste tube

here is how it looks on the other side


then I cut it out


painted and embossed


and re-assembled


I have a couple of ideas in mind but haven't did anything further with it......So
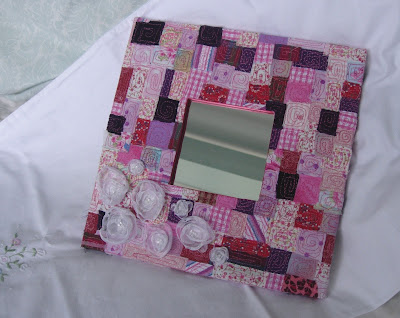
 I still keep looking at all the little experimental pieces and pondering over where to go next with my rose theme......I made some little fabric buds which I havent managed to get a picture of, its very difficult here in Scotland at the moment to get good light into a picture unless you go outside and its raining so not possible at the moment I will try and get some soon. What I have noticed is that I never really left the roses theme, I just carried it along with me, I tend to wander over onto other little side projects like the scrappy hearts, I followed that up with some more experimenting with the scrappy fabrics this time it was the pinks and purples box and decided to do this little mirror from the 'new' fabric I made from the scraps

perhaps the colours I was working in drew me back to thinking again about roses.
It gave me a chance to try out those little chiffon roses with the beaded centres


Monday 28 November 2011

Purple Hearts


I made these 'Purple Hearts' earrings from a beautiful gift bag I received for my birthday.
The gift bag was from 'Willow' (I think) with some lovely Burt's Bee skincare products in.
I just loved the pattern on the bag and had it sitting on a shelf in my workshop until I decided to make it into something.

I just thought it was too good to just put in the paper bin!

Perhaps they would make a nice gift for someone.....

Wednesday 16 November 2011

Happy Scrappy Hearts

The little boxes I keep on my cutting table for all the little leftover scraps from projects are filling up

 and are inspiring in themselves,

I opened the one with all the blues and greens and enjoyed an afternoon last week

making these little Scrappy happy hearts.


I was going to make them hanging hearts,

 then I thought they might look nice adorning a wreath,


 but they are so tactile I feel more inclined to display them loose,


where they can be picked up

 touched and held

 in your hand

 they are lovely to hold and

 so full of happy!


So they are

 available as is

 to do with what you wish and enjoy........here


Monday 7 November 2011

Machine Embroidery ....a little bit of progress

Remember this?

Blogged about here Machine Embroidery


Then again here Stitching with Tissue Silks

another abandoned project, well, more an experimental piece,
 I didn't have a finished project in mind for it


I retrieved it from the the UFO basket on my worktable ....thinking .... I'm on a roll with this clearing out and finishing things...its quite good :)


Every time I think about doing something more to it, I hit a brick wall and a little voice from my past (A lovely Lady called Pauline, my City & Guilds Tutor) comes in and says  "If you don't know where to go next....cut it up and weave it!" (it became the class quote :)
Now I once suggested this in a conversation with some ladies (family who were visiting and requested a little look in my studio) regarding this little piece, the thought horrified them, they said it was lovely as is and that I should just frame it.
That was never going to happen!

So out came the scissors!
Im sorry to say I dont have pictures as I set about it one evening while pondering in my little studio and the evening is never a good time for pictures.

This is what it looks like now.


I did weave it, well I have never did this with a piece before..... I then machine stitched it to some lovely teal coloured velvet fabric.
Im thinking it's going to cover a mirror frame ..... well I have a pile of those that need used up! .......I really am on a mission to use up stash and finish projects :)
I dont think I'm going to machine stitch on it any more ....Im thinking the next step is to get it on a frame and hand stitch some more detail into it and perhaps some beads.
Any thoughts on this? I would love to hear them.

Thanks for stopping by!
Yvonne x

Sunday 6 November 2011

Romantic Rose Inchies

I started these little pale pink inchies when I was working on the romantic hearts collection.
I set them aside for other projects and rediscovered them a few days ago, 
In another effort to de-clutter my sewing table I enjoyed some inchie time.

Pretty peachy pink pastel shells,  bugal beads


tiny pearly glass seed beads, flowers and dragonflies


crystal amethyst, a vintage diamante,


a shiny silver star, antique lace ......

french knots, shell button hearts,  a romantic ribbon rose.

each backed with white cotton and hand stitched edging


and if you know of a place that they might feel at home ....Boxoftrix on Etsy <~ click here

Thanks for stopping by!
Yvonne x

Friday 4 November 2011

Memory Quilt from baby clothes

Charlottes Quilt
as mentioned in my previous post I have begun making my way through Charlotte's baby clothes to make her a keepsake quilt.
The first two blocks I worked on were pretty T-shirts age 12mths

The pink one had curves at the two top corners where the armholes start so I cut off the puff sleeves and overlapped the corners to make it more square.

To the cream coloured one I added the extra hem frill from the back panel to sit above the front one.

The next one was a bit more tricky


A pretty tunic dress 3-6mths so not very big and a little stained in places. I was able to save the embroidered parts and I had to cut it into four and use some fabric from the back to get big enough pieces for a block about the same size as the other two. I added a pretty embroidered motive saved from the back of the pink t-shirt and the back hem frill which I might sew along the middle.

Next I cut up a little bib


separated it from the towel backing


Cut into a heart shape it looks quite pretty


....and this will complete another square.


All those little bits left over wont go to waste, they have all now been added into the rag rug!

I'm so enjoying these two projects working on :)
Thanks for stopping by!
Yvonne x

Wednesday 2 November 2011

Two String Rag Rug Loom

I decided not long after Charlotte was born, I was going to make a quilt from her baby clothes, or some of them, she had so many pretty things. A couple of weeks ago I sorted through them all choosing what I thought I could use in a quilt and I gave the rest away.
I have started on the blocks but first I wanted to show you this

These are the leftover bits, I decided to have a got at making a little rag rug.
This is the beginning


Pretty isn't it!
I pulled out an old book that I bought for pennies in a library sale about 10 yrs ago.
The book covers so many methods and after a couple of evenings reading the different styles I decided on the Loom Technique, this was rediscovered by Ann in a long out of print American book and works on the principle of the oriental Ghiordes knot.
After a lot of searching on the net it became clear that I wasn't going to pick up one of the looms from a stockist any time soon. However after finding a few pictures of different versions, some made of wire some of wood I run the idea by Kevin and he offered to make me one.
 How lucky am I!
 Made of  2 pieces of wood (I knew those old kitchen shelves would come in handy one day!)

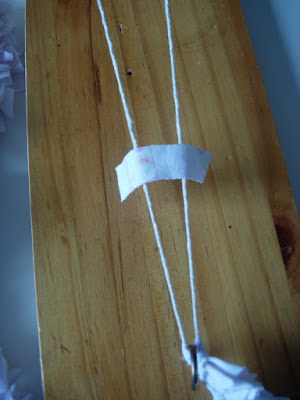
  two large screws to hold two balls of cotton string and two eyelet screws to guide the string and hold in place
 (I just loop it round once and tighten it) 

One large hook at the bottom to hold it taught
and its ready to go!
with little pieces of cotton measuring half an inch wide x 2.5 inches long
I used a little cutting gauge made from a strip of cardboard.

I got my trusty assistant to to the next bit, she is very keen to have a go!

fabric looped over the top and up through the centre of the strings

These are fairly quick to do and once you have gone all the way up the string

its time to unhook and pull this length in front of the front hook again.
The length is worked on continuously until you have a few feet, then its time to coil it round and sew it flat on the back...... this is what it looks like

then pulled down tight to the hook....and so on.
So far I have used the leftovers of 3 little tops and one pair of all in one PJ's
and I'm just about ready to stitch some more in place.
What I like about this method is its easy to carry around and you can do it while you sit in the evening.
They are all fabric, no additional backing required and can be popped in the washing machine.
If you have any memories or stories of seing rugs made in this way I would love to hear them and any pictures of any of those rugs would be lovely to see.
Thanks for stopping by
Yvonne

LinkWithin

Related Posts Plugin for WordPress, Blogger...