Showing posts with label sewing. Show all posts

Thursday, 24 January 2013

Pentagon sewing box

This is a little pentagon shaped sewing box which I have been working on for a few weeks
I started on this in October when I joined Airdrie branch of Embroiderers Guild with my sister Theresa
I'm delighted to have finally finished it.
 I enjoyed making it, making a box like this has been on my to do list for a long time,

but it's a very time consuming project very precise in the construction. I adapted a lot of the construction from gluing pieces together to stitching,  I'm not a fan of glue as a permanent hold in fabric.
I like the shape of it and there is plenty of storage space inside for little things.
the little thread holder is a length of willow covered in the fabric,
the instructions called for using a pencil to hold a reel of thread
but I wanted to make use of these metal spools which I used with old sewing machines, I no longer have,
 so they are a nice little reminder, also means I can store more thread colours in there ;)

 I bought the fabric a while ago because I liked it but with no special project in mind
 I think it perfect for the box,  I love the colours and the pattern.

There is a tiny crystal stitched to each point on the lid and a bead tassel to the top
The lid is padded with wadding, so it can be used as a pincushion too.
another project complete!

Tuesday, 1 May 2012

Sew it's Tag Tuesday!

It's my sisters Theresa's 60th birthday today so my creative efforts this week have gone into her card & gifts and sugar flowers for her cake, which I'll be making for her fancy dress party on Saturday
I will be posting more about all this later tonight
(after I have given her the gifts)
I haven't had a lot of time this week to think about,
never mind make a tag for this weeks theme 'Sewing'
I made this last night about 11.45pm when I finished Theresa's present
Sew! this is a very quick offering of a tag, but I kinda like it.
The gold zig zag stitching was already on this clothing tag, so it was a good one to use
A rummage in the button jar and 'allsorts' drawer produced the embellishments.
A closer look at this sweet little vintage glass button in its brass casing
 with vintage green thread still attached,
 

 and the metal screw handle from my old sewing basket which is long gone

 At the bottom, a cute little vintage shoe button and miniature scissors hooked onto a safety pin stitched at the ends to hang from the zig zag stitching to finish.
Tag: Re purposed clothing tag, linen thread label
Embellishments: Buttons, hooks, safety pin, metal sewing basket handle, miniature scissors.
Tie: Ribbon.
On the subject of sewing, Embroiderer's Guild tonight, returning after a long hiatus 
We are doing beaded fringing..... looking forward to it!
Yx

Sunday, 8 April 2012

Easter week activities

I have been busy this week with a few different projects and things to do.
The beginning of the week saw the fridge taken over with these little creatures

 chocolate bunnies, I like to make these for the children in the family.
I also made Easter Eggs for us here at home but forgot to take pictures of them before we tucked in today opps :)
 I decorated more eggs to give as gifts too,

 I did each one in a different colour of beads and matching ribbon
 Yellow
white
 pink
 blue, green and red.

 They did enjoy a small spell on my Easter tree,
(again I forgot to take a picture)
 before being packed into my basket on Thursday
we enjoyed a family get together at my mums, a chance for the children to catch up
 and spend some time together.
The other packages in the basket are a two belated birthday gifts
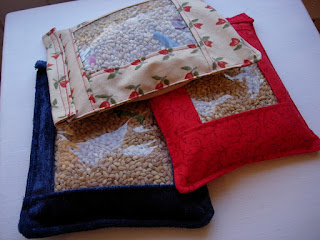
Peek and Seek bags also known as (I spy bags) 
for my niece's two little girls, Grace (6) & Lois (3)
The bags are filled with barley and a selection of little trinkets beads buttons etc. Attached to the bags is a little laminated picture and typed list of all the little things you have to search for and find in the bag.
I have made a few now to give as gifts.
The 3rd blue bag on the bottom of the pile is a gift for Adam who is also 3.
 His party was on Saturday, Charlotte had a fab time, there were some animals there for the children to see, and get up close,
 some cute some not so cute, there was a little duck wandering about
 which had a nibble at her hand but she was'nt scared
 her favourite was the dragon.
There was also a tortoise,
  rabbit, cockerel, rat, mouse, scorpion, snake tarantula, very large cockroach, and a guinea pig.
So quite a busy week really :)
Today a spent a little time in my studio working on my tag for Tuesday
 ...the theme is spring cleaning . .  and has been a bit of a challenge.
I hope that everyone has had a peaceful Easter Day
Yvonne x

Wednesday, 30 November 2011

Anyway!.....about the roses

I'm sure that many of you who are creative will understand how its easy to get a little unfocused where there are so many things you want to do and so many projects on the go.
I did start out some months ago with the intention to work for some time exploring and experimenting through a theme, 'Roses', I did some experimenting, and shared some of what I did, 
 

and some I didn't manage to show....

playing around with tyvek


and metal


using the image from stitched paper rose I drew an outline on a metal paste tube

here is how it looks on the other side


then I cut it out


painted and embossed


and re-assembled


I have a couple of ideas in mind but haven't did anything further with it......So
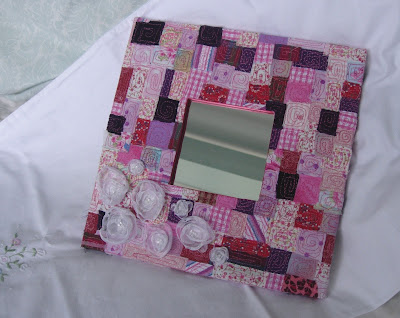
 I still keep looking at all the little experimental pieces and pondering over where to go next with my rose theme......I made some little fabric buds which I havent managed to get a picture of, its very difficult here in Scotland at the moment to get good light into a picture unless you go outside and its raining so not possible at the moment I will try and get some soon. What I have noticed is that I never really left the roses theme, I just carried it along with me, I tend to wander over onto other little side projects like the scrappy hearts, I followed that up with some more experimenting with the scrappy fabrics this time it was the pinks and purples box and decided to do this little mirror from the 'new' fabric I made from the scraps

perhaps the colours I was working in drew me back to thinking again about roses.
It gave me a chance to try out those little chiffon roses with the beaded centres


Saturday, 21 May 2011

Rose of Sharon Quilt

Firstly I want to show you this picture of the Rose of Sharon quilt my sister Theresa and I worked on for her daughter Adele. It's a double bed size completed in 1994.

As I wrote previously, I'm now working on a black and white one, a smaller version, for my sofa, a square one with 4 blocks each side.

After I posted about the problems I was having with the grey fabric, I read Anne's post about using freezer paper for applique I thought that it looked like a much better way so I gave it go.
If your read her post the shape is first cut out of freezer paper this is then ironed onto the right side of the fabric, however....I didn't have any freezer paper but the outline of each shape was already drawn on the back of each of the cotton pieces so I thought I would give it a go with the glue

you can see the coloured glue along the snipped edge up to the line.

edge folded over with the use of a cocktail stick

the finished piece already to sew on.
This worked fine I thought but I decided to get the freezer paper to try it out on the bigger bits to see if it would give me a smother rounded edge and to try it on the grey fabric.

The freezer paper method worked great on the cotton fabric but not the grey, it wouldn't stick with the glue, the folded cut edges kept jumping back up and it also melts too easy with the iron....as I found out on my trial piece, so after about 30 mins trying to get the edges to stay stuck under, I melted the whole lot with the iron!!!! grrrr.....I didn't keep, I popped it in the bin, decided not to let it annoy..... it sorry no pic.

However I'm still delighted to use this new method for all the other pieces and have found the sewing machine method of backing the grey pieces and turning right sides out is the best way forward here.

I have now competed the first two blocks for the second side.
The glue method gives a much neater finish and I find the pieces a lot easier and quicker to stitch on.


Not the best picture I have to say but I took it this evening in artificial light.
I'll get a better picture tomorrow of these and all the other 4 completed for the other side of the quilt.

Thursday, 24 March 2011

New Apron

Yesterday I decided that I would have a little break from the black & white and jump into a little project I have been wanting to do for a while.
To make a jeans apron to keep my sewing and craft bits and bobs handy and just for the fun of it really!

I saw Betz Whites tutorial for her cute little apron a while back and made a mental not to self to have a go soon, I then saw another one from Lucy at My Byrd House and this simple idea from Kleas if you don't fancy the sewing option.

Having a few pairs of old jeans stacked in a drawer in my studio I opted for a pair of Kevin's as the pockets were bigger and all that was left of these was the top bit, the legs having already been used for bunting triangles..... no waste in this house!
So here is my version

I was able to just use the button closure so no need to add ties

Love this fabric which I used for the inner back pocket

some leftover cotton tape stitched along the bottom edge and some of my fav blue and green buttons to finish ..... quick simple easy...made in an hour!

Me sporting my new craft apron!
Now I'll know where to find my tape measure, little metal ruler, pencil, notebook, scissors, needle threader, chalk and lip balm. I might decide to add a little pin cushion and a fabric flower or two!                                   

Sunday, 20 March 2011

Rosebud Floor cushion

Her tutorial is so well thought out and so easy to follow.
 I just had to make one....

I used a length of fabric that I had cut from some IKEA curtains you might recognise the fabric.

I made my own piping from some rat tail cord and some pretty floral print fabric from my stash...

I thought the french knots would add a girly feel and highlight the floral piping

I added a zip (one of 3 I purchased from eBay for a couple of pounds)
I wanted to be able remove the fiberfill to wash the cover. Charlotte helped me stuff the fiberfill which was reclaimed from a single quilt who's stitching had come undone, rendering it useless as a duvet but still usable for this cute project.
I calculated that this cost me less than £2 to make as I had almost everything that I needed.


French knots are my favourite embroidery stitch these did not take me as long as you might think.....

Beautiful variegated cotton Perle from DMC, One of my impulse purchases at the recent Creative Stitches show in Glasgow, not knowing what I was going to do with it, I just loved the colours, it was a perfect match for the flowery fabric!

and a perfect fit for Charlotte she loves the feel of the little rosebuds.
I'm so pleased with how it has turned out!

LinkWithin

Related Posts Plugin for WordPress, Blogger...