When I was about 14 yrs old my parents took me on a 4 week trip to America to visit family in Delaware. It was a wonderful experience in so many different ways. We have a large extended family over there, all from my Dads side. One lady I met, a very creative person, had a chest full if things that she had made by hand. One of those things stuck in my head, I really liked the idea of it, it was simple, 100% re-cycled and a usful little item.


A trivet in the shape of a bunch of grapes!
This little project has been filed away in my head for ...dare I say it.....32 years!
In an attempt to get more things out of drawers and bags and into jars and onto shelves in my workshop I came across a tube with some saved bottle tops and I instantly remembered why they were there.
The time has come I must do it, I thought it must be the longest 'to do' ever and I knew I had some velvet jeans fabric leftover in the perfect purple for my project.
The other items you will need are 29 bottle tops,
soft light coloured pencil,
a small jar lid, scissors, a needle and purple thread and a scrap of brown felt (for the stalk)
and some chocolate to enjoy while you stitch!
This little lid was a perfect size, but anything that has a diameter of about 5-6 cm is fine.
draw round the lid making best use of your fabric.
cut one out and size it up with bottle top,
there should be enough to wrap and meet in the middle.
cut the rest out
Thread your needle,
double the thread till the ends meet and knot the end,
stitch a running stitch around the edge and pull the thread to gather in the edge evenly,
fit the bottle top inside
and pull shut and close with the couple of secure stitches.
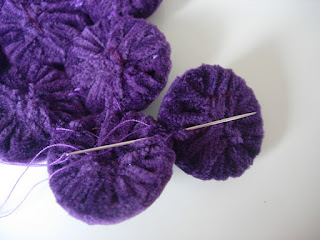
one grape done, 28 more to go!
stitch together on the back,
sliding your needle through the fabric edges with a couple of strong tight stitches
build up the shape as you go....
here is a front view....lovely velvet grapes!
finished shape,
I decided to keep it to 2 at the bottom but you might like to add another one in to the point
making it 30 bottle tops.
a simple piece of rolled felt stitched at the top
and secured on the back
Thread your needle with a length of hand embroidery thread (I used Caron Wildflowers - shade 06)
Finished trivet!
and secured on the back
To add a leaf detail draw a simple leaf outline
you will need a pencil, freezer paper, some felt fabric, a needle and hand embroidery thread
(I googled grapevine leaf images and then just copied one freehand with a pencil)
Iron the freezer paper onto the felt (my felt piece was a hand dyed scrap in muted colours of green)
cut out the leaf shape with felt and paper ironed together
try for size against your grape trivet.
Start at the base of the centre vein, use the pencil line as a guide and stitch a chain stitch up the centre.
then on the side veins.....
I found the freezer paper helped to keep the felt firmer
when you have completed your stitch lines, carefully peel the freezer paper away.
run a line of fabric glue along the back of the stitch lines........
......and press down onto the grapes then leave to dry
We use it every day to sit hot dishes down on and protect our table.
This is fun to make give it a try!
This is fun to make give it a try!


2 comments:
Wow! I love it. What a very clever idea.
It's lovely - but I think it would be a long time before I collected enough bottle tops!
Post a Comment