Saturday, 28 May 2011

Frustrated with Blogger

Im extremely frustrated with Blogger at the moment! there is a known unresolved fault that is affecting some bloggers, me included which happened on 23rd of May. They are working to fix it but nothing sorted as yet .

I would just like to let everyone that has posted comments on my posts and also to other bloggers that I follow....I am not ignoring your comments and I am reading but I am unable to leave any comments on my own or any other blogs.
However I can leave a post so just wanted to let you all know.

Yvonne x

Thursday, 26 May 2011

A little gift

It's my birthday today,
 I used to always have a gift to buy and give on my birthday too as I was born on my Dad's birthday.
He is resting in peace now, we said goodbye to him in Oct 2004, but he is never forgotten.
My birthday is always a reminder.
So in the true birthday spirit of giving ......I have made a little thing to share with you.


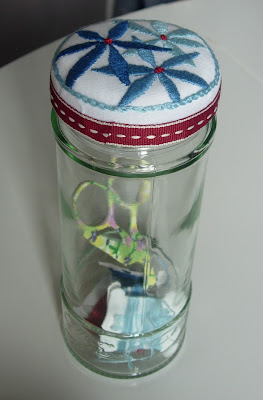
Embroidered Jar Lid Cover


I liked this jar, tall and slim, I thought it would be useful for storage in my studio but the black lid was a bit boring, my initial thought was to glue a paper cover on it, then I thought a fabric instead. Then I decided it would be a perfect little project for some hand embroidery.


My inspiration for the flower design came from the lovely book
The new crewel by Katherine Shaughnessy.
Although I did not use crewel wool or linen twill fabric as described in the book,
I liked the patern and the way the flower petals overlapped on some.


I used a piece of white cotton curtain lining and some DMC embroidery threads in 3 different shades of blues and a little bit of red rayon floss.
3 cotton wool pads
thin double sided tape
ribbon to edge.
embroidery hoop, needle, scissors
and a clean jar with lid (preferably one with a deep sided lid)
I haven't gave any measurements as jar sizes vary, and each one you do will be unique.
Keep your design simple and have fun.


1. Put you fabric into the hoop and lay face down on the table using a light pencil draw round the lid to leave a circle on the back side of your fabric.
2. Draw you flower outlines within the circle.
3. Embroider the flowers, I used 3 strands for flowers in satin stitch 1 strand red for french knots.
4. Chain stitch round the flowers using the circle on the back as your guide.


5. Stick a layer of double sided tape around the top edge of the lid.


6. Take the 3 cotton pads and gently tease them apart to fit the top of the lid.


7. Remove embroidery from hoop and trim off excess fabric leaving enough to cover the deep edge of the jar and a little over.


8. Place embroidery right side face down on the table with the cotton and lid centred on top, peel away backing tape.


9. Bring the fabric up matching the chain stitch edge with the lid top rim and press against the tape


10. Repeat on the opposite side to keep fabric centred


11. Repeat on the other two opposite sides.


12. The tape should allow some repositioning of your fabric until you are happy that the chain stitch edge is lining up to the lid edge.


13. It should look something like this.


14. Add another thin layer of double sided tape to the lower edge of the lid and peel backing tape away and press the lower fabric edge against it.


15. Trim away excess to lid edge.


16. Add another layer of double sided tape over the fabric this time around the bottom edge of the lid and cover with ribbon strip.


17. Secure edge with another little snippet of tape.


And there you have it......finished!


Of course the idea could be used to make a lid cover for any size lid, 
 it would be nice to see yours if you make one :)

Wednesday, 25 May 2011

Sketchbook scribbles & doodles

I have enjoyed getting in touch more regularly with my sketchbook these days.
I have it constantly to hand, well I say 'it' I actually have six that I can think of off hand that are currently in use but I'm trying to stick to one at the moment.
I think it would be great if I could keep one for a journal, one for my rose theme, one for jewellery etc, but it never works out that way and they are all mixed up....no rhyme or reason to them.
 I thought you might like a little peek at some random pages


petals


still working on this one


 tree with birds
prisma pencil overlay


doodles .......


 knots and buttons

Saturday, 21 May 2011

Rose of Sharon Quilt

Firstly I want to show you this picture of the Rose of Sharon quilt my sister Theresa and I worked on for her daughter Adele. It's a double bed size completed in 1994.

As I wrote previously, I'm now working on a black and white one, a smaller version, for my sofa, a square one with 4 blocks each side.

After I posted about the problems I was having with the grey fabric, I read Anne's post about using freezer paper for applique I thought that it looked like a much better way so I gave it go.
If your read her post the shape is first cut out of freezer paper this is then ironed onto the right side of the fabric, however....I didn't have any freezer paper but the outline of each shape was already drawn on the back of each of the cotton pieces so I thought I would give it a go with the glue

you can see the coloured glue along the snipped edge up to the line.

edge folded over with the use of a cocktail stick

the finished piece already to sew on.
This worked fine I thought but I decided to get the freezer paper to try it out on the bigger bits to see if it would give me a smother rounded edge and to try it on the grey fabric.

The freezer paper method worked great on the cotton fabric but not the grey, it wouldn't stick with the glue, the folded cut edges kept jumping back up and it also melts too easy with the iron....as I found out on my trial piece, so after about 30 mins trying to get the edges to stay stuck under, I melted the whole lot with the iron!!!! grrrr.....I didn't keep, I popped it in the bin, decided not to let it annoy..... it sorry no pic.

However I'm still delighted to use this new method for all the other pieces and have found the sewing machine method of backing the grey pieces and turning right sides out is the best way forward here.

I have now competed the first two blocks for the second side.
The glue method gives a much neater finish and I find the pieces a lot easier and quicker to stitch on.


Not the best picture I have to say but I took it this evening in artificial light.
I'll get a better picture tomorrow of these and all the other 4 completed for the other side of the quilt.

Thursday, 19 May 2011

In remembrance


Today I have lit a little candle from Lourdes for a very dear Lady, a very old family friend Betty, who sadly passed away this week. Her funeral is today but I am unable to be there in person, I don't have transport today and it is too far away to take public transport. I feel sorry that I can't be there.

Betty has gone home to be with Ben her husband who died a few years ago.
They didn't have any children of their own  but they shared in our family occasions, weddings, christenings, my parents silver and gold wedding anniversaries and special birthday events. They used to enjoy visiting when we were children and always took time to chat to us kids and would bring us sweets.
Both were very good friends of my parents, Ben was my Dads fishing pal and they would sometimes spend sunny days out with us on some loch or river picnicking & fishing.

I am sad that she is gone but happy that they are together now.

May she rest in peace x

Monday, 16 May 2011

Custom Converse

Arnt these cute! first size pink Converse in little size 4
Little C has had these a few weeks now and they kept calling me to pretty them up.


So on Saturday I spent a lovely sunny afternoon in my little studio watching C and her daddy tend all the new life in the garden that is suddenly sprouting up.........and I set to work.

I still have some little snips of that pretty rose fabric left over from her douvet cover re-make which I also used in the tea party and dolls pram projects

So I started with that for inspiration


and chose some beautiful co-ordinating pale blue variegated DMC cotton Perle and stitched around the edge.


then some bullion knot roses, with a touch of crimson in the middle.

(can you see my rose theme is getting everywhere)


 I found the last of some beautiful hand dyed Oliver Twist stranded cotton in shades of blue and green....perfect.... and I had just enough left for this little project.

Replace the laces with beautiful pale green satin ribbon


 each side is unique


and now they are very pretty & girly


I had so many ideas of different way to customise these little cuties but it took my rose theme to get me inspired to do it!

These are my son Harry's


he hasn't worn them very much and now sadly he has outgrown them :(
shame :(
Not to worry, ..........they fit me! :)
Watch this space!

Sunday, 15 May 2011

Thrifty finds and blogger

With blogger being down last week, it was difficult, I was itching to post, been busy with so many different things and thrifty finds to show
like these lovely little things!

Soap dish £1
Pink Lidded  dish £2.50
1 of 2 cotton embroidered pillowcase 50p for both!

I have some more things to show but no pictures as yet.

********
 The little tutorial I posted earlier was sitting waiting to go when all the trouble started.
Unlike some I was lucky in that only one of my posts was affected and even then only a couple of minor things. On the other hand my draft post in my dashboard were multiplied by 3 in some cases, much better than being wiped out. I guess it was all down to timing and I have a habit of saving myself as I go along, just in case, I know they are saved every so often as we are writing but I'm a just in case kinda gal.
So I hope you enjoy the little tutorial I have written while playing around in my roses theme.
Yvonne x

Foliage to Fabric

Fabric Leaf embellishments
From foliage to fabric
I love using transfer mediums especially
fabric crayons and paints

The simple leaves from my yellow rose were perfect for taking rubbings from with the crayons


I painted over these with the transfer paints

and cut them out


I laid these out face down onto white cotton fabric, covered with more fabric to hold the paper cut outs in place then pressed them with a hot iron.

********
I didn't get a good picture of the transferred images before the next stage but have since did some more of these and decided to iron the image onto pale green cotton shirt fabric to good effect.


******************


Transferred images covered with little pieces of chiffon and organza fabrics


 free machine stitched around the outlines


You can still see the leaf crayon imprints through the organza

Then I went a bit mad and had some fun with some more free machine embroidery


 trimmed to the stitched edge


Fabric Leaf embellishments

Hope you enjoyed this little tutorial
Transfer paints by Decca
Fabric transfer crayons by Crayola

Wednesday, 11 May 2011

Experimental stitching

A little experimental rose piece I worked on over a couple of days.
Not very good I might just add, the blanket stitch around the openwork leaves a lot to be desired but its just a fun piece, I didn't have a plan, just used the outline of one of my stitched paper roses. divided it into sections with a running stitch.
I just wanted to have fun with some fabric scraps and threads and a sudden urge to hand embroider.


I learned some from this exercise too, the fabric I chose was not really suitable for openwork, the weave was to open and it frayed at the edges, was quite difficult to keep it in shape, it had a bit of stretch to it too which didn't help, my own fault for not consulting one of my many needlework books which might have advised on a suitable cloth!
Talking of cloth I was quite annoyed with the amount of dirt that built up on the cloth over such a short space of time and I did wash it when it came out of the hoop yesterday but there is still a visible grime circle line where the hoop had been.

Later on last night I was reading about Catherine's dress, so beautiful with all that hand embroidered lace, totally exquisit! and she carried it so well....every step, so elegent and graceful and swishy!.......  ...anyway ........yes I was reading about the ladies who worked on the lace from the Royal school of needlework and how they were kept in the dark over what the lace was for or which designer they were working for....what a wonderful job to be able to sit and embroider knowing its going to go into one beautiful creation after another......anyway ! .......these ladies who worked by hand on the lace for the dress had to wash their hands every 30 minuets! ......so I was thinking its no wonder the dirt that collected over my little rose sample after sitting on the arm of the sofa in between being picked up worked on and set down every couple of hours or so over the space of 3 days!

anyway!.......what I was thinking after I read about the embroiderers and the hand washing was, surely they must have ended up with very dry hands and if not what were they using in between washes to keep their hands and fingers soft and able to work?
Perhaps I should be asking the Royal School of needlework that question.....hmmm

While studying City & Guilds Embroidery a few years ago one of the ladies in the class introduced us to that wonderful stuff called Udder cream, yes for udders! ..... I'm sure many of you have heard of it and use it. Available at the vets Im told.
The beauty of this stuff was that it could be used as hand cream but would leave no greasy residue so ideal if your working with fabrics and threads or beads.
I asked her to get me some the next time she went to the vets, I don't have any animals so was not a frequenter of the vets.
Needless to say the large tub kept me going for some time but it didn't last for ever.
About a year ago now I purchased some online, but when it arrived it was the most, disgusting pink runny gooey mess and useless. So I was put off buying any more.
So what to do ?......what do you use?(do let me know)......what do they use? (RSN).......what vet can I get that good udder cream from? (note to self: try and remember who got it for the ladies in the CG class).......all things I have to find out for next time........

Tuesday, 10 May 2011

Watercolour dying and painted quilts

Some hand dyed pieces of trim in rosy colours


I've had a little box of Pentel watercolour fabric dyes for a few years now, I think they are great for dying small quantities of fabric, lace, trims, and threads. If you are like me and dont do a lot of dying but like to dabble now and then, these are ideal. I like them because there is no mixing up or measuring out or that feeling that you have to grab every bit of fabric around to justify a bucket load of dye. They are fixed with a hot iron and washable after fixing. The cost wont break the bank either and great for workshops etc.


Thinking in the theme of roses .............


Pretty pink daisies, cotton lace trim, and some silky leaf lace edging

The quilted pieces are samples I've been working on.

The top right sample with the quilted leaf design was brushed with the watercolour soloution letting it soak in, this was after I had painted it with a coat of green fabric paint and a roller. Its not very noticable in the picture but I added irridescant watercolour medium to the solution which adds a little sparkle to it.


 Inspired by a tutorial in the Quilting Arts magazine 10th Anniverary issue by Ana Buzzalino who was inspired by a painted quilt technique used by Laura Kemshall, on further investigating I found Laura has co written a book on the subject. The painted quilt.
I have borrowed the book from the library for now but I have added it to my 'worth buying' list.
Also while going through some back issues of Workbox I found a picture of one of Laura's beautiful art quilts,  which was displayed in her first solo show at the festival of quilts 2004 at the NEC Birmingham

Beautiful isnt it!

 
I want to do some more reading on the subject before doing anymore to the other two samples.
My dyes as you can see are running out I will have to get some more, I bought this little box of 12 from Millers art shop a few years ago. I couldnt find them in their online shop, so after varoius searches online, it took me a while, I tracked down a supplier of these little tubes of paint in the UK you can get them here

LinkWithin

Related Posts Plugin for WordPress, Blogger...