Showing posts with label Tutorial. Show all posts

Sunday, 20 January 2013

Butterfly Girl Bag

A T-Shirt to Bag How To
I couldn't find another tutorial on the Internet when I was looking to make this so hopefully it will be useful to all those mums out there with little girls who don't like to let go of that favourite t-shirt.
This is Charlotte's favourite T-shirt of all time! 
she got it for her 2nd birthday
 and when it got too short
I added a bit from another outgrown t-shirt onto the bottom,
stitched in place with a few French knots....
..and she wore it for another few months....she grows very slowly
Now its just too tight,  so she has finally agreed that its too small
but just the perfect size for a little bag don't you think?
First of all I cut the body section off just below the arms and
the cap sleeves away from the upper body and long thinner part of the sleeves
from some old blue sheeting I cut a piece for the inner bag
I have not used any measurements its just all guesswork
 joined the cap sleeves together
pin onto one side of inner 
and stitch in place

 cut double length folded piece of fabric roughly the size of the other side
 make a pocket by stitching on 3 sides
insert interfacing
should look like this
 pin to other side folded unstitched edge at the top
stitch both pockets in place on 3 sides to create inner pockets
stabiliser on the back makes stitching tshirt fabric much easier
fold inner section in half and stitch along the bottom and up the side to make the inner bag

next take shirt body and turn inside out this will be the outer
 machine along the bottom
 stitch across each of the corners
 turn outer right side out
 put inner inside outer and fold edge in and pin, sew together
sew strips of the fabric from the arms together to make a long strap
I also used a decorative stitch along the length,
 and hand stitch to each side of the bag
 all done!
perfect size for her new dolls pushchair
I hope you find this tutorial useful and would love to see one if you make it.
Yvonne x

Wednesday, 29 February 2012

Jumper to slinky Scarf

~ Jumper to Scarf  ~


I have had this black jumper for a few years now,
it's been a favourite, not an expensive buy,
 but I love the slinky feel of the fabric


Sadly it gave up on me and developed a hole on the back.
I haven't worn it now for about a year but couldn't just throw it out,


So I re-fashioned it into something I could use


First I cut off the sleeves


then I cut up one of the side seams


 opened it out flat 


and trimmed of the ribbed waistband.


next I folded up the bottom longways over to reach the arm hole


luckily the hole was right on this line so I didn't lose any fabric width!


Then I divided the long strip into two skinny strips


and folded these over right sides together.....


and on to the sewing machine
 I sewed the two short cut flat ends together to make one very long skinny strip
  (sorry forgot to take a picture of that little step ...oops!) 


I then fitted the foot for over locking stitch  ( 'C' foot for a Janome ) 
and stitched all the way along the edge 

I then used a large safety pin pinned to the inside to help me turn the very long tube right side out


then hand stitched the two ends together to make a closed tube


and I now have a very re-usable slinky scarf!


glad I didn't throw that jumper out now!

Hope you found this little tutorial useful,
 perhaps you have a favourite jumper or top that could do with a re-fashion.

Yvonne x

Thursday, 23 June 2011

Bunch of Grapes Trivet

When I was about 14 yrs old my parents took me on a 4 week trip to America to visit family in Delaware. It was a wonderful experience in so many different ways. We have a large extended family over there,  all from my Dads side. One lady I met,  a very creative person, had a chest full if things that she had made by hand. One of those things stuck in my head, I really liked the idea of it, it was simple, 100% re-cycled and a usful little item.


A trivet in the shape of a bunch of grapes!
This little project has been filed away in my head for ...dare I say it.....32 years!
In an attempt to get more things out of drawers and bags and into jars and onto shelves in my workshop I came across a tube with some saved bottle tops and I instantly remembered why they were there.
The time has come I must do it, I thought it must be the longest 'to do' ever and I knew I had some velvet jeans fabric leftover in the perfect purple for my project.

The other items you will need are 29 bottle tops,
 soft light coloured pencil,
a small jar lid, scissors, a needle and purple thread and a scrap of brown felt (for the stalk)
and some chocolate to enjoy while you stitch!
This little lid was a perfect size, but anything that has a diameter of about 5-6 cm is fine.

draw round the lid making best use of your fabric.

cut one out and size it up with bottle top,
 there should be enough to wrap and meet in the middle.

cut the rest out  

Thread your needle,
double the thread till the ends meet and knot the end,

stitch a running stitch around the edge and pull the thread to gather in the edge evenly,


fit the bottle top inside

 and pull shut and close with the couple of secure stitches.
one grape done, 28 more to go!

stitch together on the back,
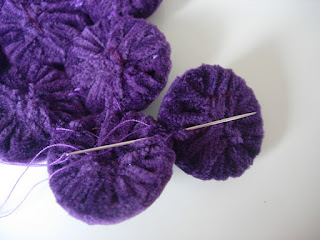
sliding your needle through the fabric edges with a couple of strong tight stitches

build up the shape as you go....


here is a front view....lovely velvet grapes!

finished shape,
 I decided to keep it to 2 at the bottom but you might like to add another one in to the point
 making it 30 bottle tops.

 a simple piece of rolled felt stitched at the top
and secured on the back

To add a leaf detail draw a simple leaf outline
you will need a pencil, freezer paper, some felt fabric, a needle and hand embroidery thread
(I googled grapevine leaf images and then just copied one freehand with a pencil)

Iron the freezer paper onto the felt (my felt piece was a hand dyed scrap in muted colours of green)


cut out the leaf shape with felt and paper ironed together

try for size against your grape trivet.


 Thread your needle with a length of hand embroidery thread (I used Caron Wildflowers - shade 06)


Start at the base of the centre vein, use the pencil line as a guide and stitch a chain stitch up the centre.

then on the side veins.....

I found the freezer paper helped to keep the felt firmer

when you have completed your stitch lines, carefully peel the freezer paper away.


run a line of fabric glue along the back of the stitch lines........


......and press down onto the grapes then leave to dry


Finished trivet!
We use it every day to sit hot dishes down on and protect our table.
This is fun to make give it a try!

LinkWithin

Related Posts Plugin for WordPress, Blogger...