Friday 29 March 2013

Painting a Miniature Needlepoint Canvas

Yesterday I began on a little piece I have planned to do for a little while,
 it's more of a challenge, to try something new- painting on needlpoint canvas
do something in miniature again - it is 'miniature' canvas
I found this little image that I liked online at the Graphics Fairy,

 I loved the colours and it suited my little project in mind.
 first i traced the image at 12% on my laptop screen
 then I went over it with my micron pen on the tracing paper
next I traced the outline onto my miniature canvas which is called coin-net
not sure of the actual square/per inch ratio but its very fine

 I did this tracing with the aid of a little makeshift litebox
using a plastic tub and my micro light
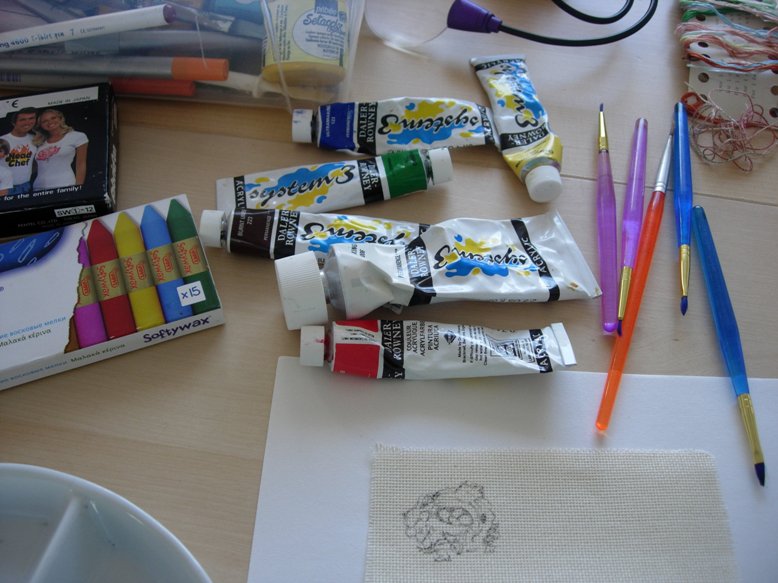
 next ....the tricky bit with paint, I read online that acrylic paint is best so I dug out what I had some system 3 basic colours and white, a couple of synthetic paintbrushes and just started, having no idea how it was going to turn out!

I put the larger image on my desktop for colour reference
and this is what I came up with
Im not aiming for an exact copy, I just liked the image and the colours in it, more using it as a starting point
  I'm quite pleased with it :)

Apart from one pincushion and a little sample I have little experience in needlepoint, so this is a real challenge , but I'm looking forward to trying it
Needlepoint is usually worked in fine wool threads but I'm going to use 6 strand embroidery floss.
I found this little card of threads from a kit I stitched a few years ago, a gift from my sister, I used it as one of the samples require for my C&G portfolio. The colours are a perfect selection for my needlepoint nest, although I will have to add a couple more to the mix.
This is the one I stitched from the kit, a letter 'Y' 
It's the one and only time I have did a cross stitch, I really don't find it an enjoyable way to stitch I dislike referring to counted thread charts, that don't make sense to me and I find the process restrictive, there are some beautiful designs out there and my sister Theresa is a beautiful cross stitcher, I do admire those who can sit and do it but I can't, I don't get on with it at all.
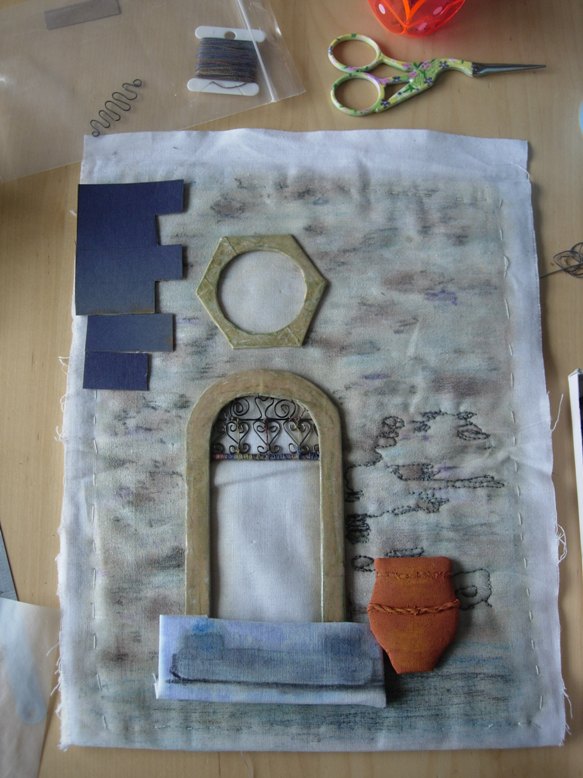
I wanted to share this little Easter Nest that Charlotte made at nursery,
 but she assured me it was all for her ;)
I wish you all a Happy Easter x


Thursday 28 March 2013

Rethymnon Door

Yesterday I spent some time on my little Cretan Doorway piece that I started in the Alison King workshop with EG Airdrie branch.
I had neglected it a little and needed to get back on track with it, I have been giving it some thought over the past few days as to how I wanted to construct the decaying door. 
So while Charlotte was at nursery I got out paints and things and got started.


I started with a piece of pale green cotton shirt fabric building up layers of water colour dyes using my photograph as reference. I will stitch into this to try and create a weathered wood effect.
next I worked on the step 
with a little paint, then Softywax fabric crayons
after hot iron fixing this will be padded out and stitched into a little too I think.
Charlotte was delighted to get out to play in the snow for a little


 so I was able to work on it a little bit more while she played


I place out the components so far,
 decided a whole wall of stone was perhaps too much 
so I thought some stonework might be a nice detail to add
 represented here with bits of card.
then I worked on a little bit of lilac silk
I may work into this more with my Markal paint-sticks 

detail of the wire-work on the doorway.
I'm off to EG Airdrie branch tonight so there will be more progress to show soon.

Wednesday 27 March 2013

ATC's for EG Swap

I'm taking part in the ATC swap at EG Scottish Regional Day 
This year it will be held in Dundee Caird Hall on 27th April.
The theme is 'Diamonds'
Participants should make two or four ATC stitched / textile cards
I lost my email with all the info on this and kept reminding myself I had to find it to print off the entry form.
I only found it this yesterday morning and realised that I had to make my two cards and have them posted off to reach Glasgow by 1st April!
I am going to regional day and had it in my head that we could just register to participate and just bring them along on the day...not so.....what I had read was that you could collect your swap on regional day and would not need to send off an extra envelope for them to be sent to you. 
I knew there was a reason I needed to find it!
So here are my little offerings for the swap


#1 ' Night Sparkle'
This was my first attempt, a bleached black fabric background overlaid with organza ribbon then fabric edged with lace and embellished with sequins, bugle beads and crystals.
 It didn't really turn out as I imagined, but its quite shimmery & sparkly.
I was more pleased with how number 2 turned out,

#2 'Sparkle & Lace'

I prefer #2 I really enjoyed working on it, I cut out the diamond shape from fusible buckram and sprinkled it with iridescent glitter and ironed between baking parchment. I ironed this onto the lace and fabric background then stitched over it. I used one of my lovely Caron wildflower threads called 'Williamsburg'
with such a patriotic colour theme it could easily have been called 'Blighty' 
I couched some sparkly stretchy trim up the side and added a little line of bullion knots and a sprinkle of french knots over the lace pattern.
After adding the backings I secured the edges in blanket stitch with DMC Ecru, 6 strands for a nice finish.
Hope they please their recipients.
These will be posted off today so they should make the deadline.
Looking forward to hopefully seeing all the entries on the day!

Tuesday 26 March 2013

Decorating Eggs

Yesterday Charlotte and I had some fun decorating eggs
The result, two pretty sparkly eggs
Charlotte wanted to paint hers blue and I choose pink.
We used food colouring gel mixed with a little bit of water painted right on to the hard boiled shell.
and just to prove that Charlotte did actually do this by herself
painting on the glue

dipping it into an egg cup half filled with glitter
turning
and twisting

gluing on the flowers
Today Charlotte took her sparkly egg into nursery in a jar, 
 the children are taking part in an decorated egg competition, 
to be judged tomorrow.
She was very proud to show her little creation there :)

L is for ....


Lawn Daisy

stitched in 'Lazy Daisy' ~ petals
'Laced back stitch' ~ for grass and in thicker thread for flower stem.

 and of course
'Leaf stitch' ~ for the leaf.

My tag for Tag Tuesday  'L'


Sunday 24 March 2013

Spring Sampler WIP

This is the Spring Sampler I am working on, I was fortunate to pick up a good printed linen 'second'  from Lorna Bateman's stall at the SECC creative stitches show about 2 years ago.
It was nice to catch a chat with her at the show this year, where we discussed the stitches she had used and the thread widths etc. I also bought a selection of the beautiful Chameleon Threads that she sells.
The piece measures 9 "x 13 "
Working on the A~Z stitch tags for Tag Tuesday has prompted me to make a start on the sampler, 
I'm not one for doing pre-printed samplers usually but the tempting mix of freestyle stitching, stump~work and ribbon work, which I have never tried before, appealed to me.

I began with the words I used white French floss and stitched them in whipped back stitch.
Next I did the borders, for the sides, I choose Anchor Pearl 5 thread in  variegated greens ( No 1352 )
   The outer and inner lines are worked in double knot.


 I beaded these two leaves to try out the beads I bought for size, Lorna advised size 15 but I couldn't get the colour in that size so I bought size 11 and used 6 beads on each leaf instead of the 10 she used. I will wait till later to bead the rest of leaves. 

for the smaller leaves in the top and bottom borders I used  'Lemon & Lime'  one of the Carron Wildflower threads. 
Daises ~ stems in DMC 3052 Green Grey Med
petals white french floss, centres DMC 744  pale yellow
 & a  herringbone border 
now adding french knots I'm using one of the Chameleon threads 
'Spring Garden' (79)  Perle No 8 

I originally put the piece on a large frame but found in the end that it's easier and more portable to work in a hoop, I will transfer it to the frame again when its time to do the ribbon work and stump-work to keep it flat.
more soon as I progress .....


Saturday 23 March 2013

Mountmellick Framed

I finished my Mountmellick piece that I was working on with Airdrie Branch EG,
and finally I got around to washing, damp stretching it and framing it up so here it is.

  I'm quite pleased with how its turned out
I did enjoy sometimes it was heavy going with the thick threads through the tightly woven fabric but the effect is lovely.
I did take some pictures as I progressed but forgot to do a post on them so here are some closer views


 a darker picture to show the texture.
This pattern was designed by Katie Pirson and featured in issue 68 of Stitch EG magazine

I'm working on another little Mountmellick piece,
this time my own design which I will show soon x

Friday 22 March 2013

Happy Birthday Charlotte!!


The last week has been so busy with Charlotte's 4th birthday on Tuesday 12th, 

We had dinner out to Celebrate
and chocolate birthday cake
(which we were too full up to eat)
I had planned a little tea party gathering for her on Saturday, 
I spent most of Friday making some little goodies
and another cake 
this one was a banana bread ring with piped banana flavored whipped cream


I cut this pretty bunting from 'Homestyle' magazine.

She has been looking forward to it all week
a bit blurred, but it was fun watching them dance and enjoy some time together
 (need to sort setting in my camera)

she had so much fun catching up with all the other preschoolers in the family.

Dakota, Charlotte, Grace & Lois


LinkWithin

Related Posts Plugin for WordPress, Blogger...