Thursday, 24 March 2011

New Apron

Yesterday I decided that I would have a little break from the black & white and jump into a little project I have been wanting to do for a while.
To make a jeans apron to keep my sewing and craft bits and bobs handy and just for the fun of it really!

I saw Betz Whites tutorial for her cute little apron a while back and made a mental not to self to have a go soon, I then saw another one from Lucy at My Byrd House and this simple idea from Kleas if you don't fancy the sewing option.

Having a few pairs of old jeans stacked in a drawer in my studio I opted for a pair of Kevin's as the pockets were bigger and all that was left of these was the top bit, the legs having already been used for bunting triangles..... no waste in this house!

So here is my version

I was able to just use the button closure so no need to add ties

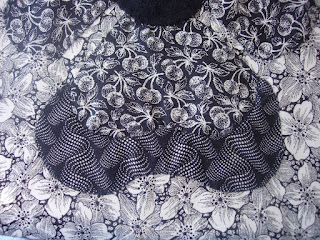
Love this fabric which I used for the inner back pocket

some leftover cotton tape stitched along the bottom edge and some of my fav blue and green buttons to finish ..... quick simple easy...made in an hour!

Me sporting my new craft apron!
Now I'll know where to find my tape measure, little metal ruler, pencil, notebook, scissors, needle threader, chalk and lip balm. I might decide to add a little pin cushion and a fabric flower or two!                                   

WIP applique

A close up of the leaf section of the ROS quilt
This is one of the first ones I stitched on, they can bequite fidley to do because of the fabric I have chosen. It's a rayon type fabric that freys easily but it has a lovely sheen on it and is hardwearing.
I decided against bondaweb after it left glue marks on the fabric and made it quite stiff, ok for wall hangings but not for a lap quilt, I want if to drape nicely and feel soft.

Theresa suggested that I use a different method for these pieces, she showed me some applique pieces she had bought from USA which had been backed , this made them easy to sew on and took the frayed edge problem away.  I wasn't keen at first but after stitching another couple on, I decided I would try this other method. I don't know if it has a name,  if you know of it and can tell me what its call do let me know.

You could do it by hand but I decided to use my machine


The fabric is pinned right sides together with a thin backing fabric,  and the outline of the shape is drawn onto the backing fabric.
The outline is then stitched on the machine, leaving an opening somewhere


the piece is then cut out and trimmed close to the stitch line turned inside out, ironed flat then stitched in place. Here is a picture of how it looks.

It's not as flat as the other one but still looks good, and I think it will be more durable.
I have to say it was so much easier to stitch down, although some might think this is cheating.....

I decided to try this method with the outer petal section and took more pictures to show you.
As these shapes had already been cut out and marked with the outline on the back, I place these right side down onto the backing fabric and stitched on top of the outline


Cut them out and sniped across the corners 


turned them inside out..........


I used this ball end tool to help me get into the corners
and ironed them flat.


it was more difficult stitching these into place and some puckering occurred on the inner petal piece as you can see in the next picture......


but I was able to straighten most of it out when I stitched along the other side


this puckering is mainly due to the fact that the inner petal pieces were not a more uniform shape as they were stitched on the using a different method......hope I'm making sense here

I think if this method was used for the inner petal pieces also then they would all fit nicely together.

Although this method, does take more time preparing the pieces and involves using the sewing machine, its quite straightforward and I think once you have the pieces it's still enjoyable to sit and hand stitch them in place, what you don't get is the fiddly fraying edges popping out and I'm not having to find the outline all the time.


I will decide at the end of this forth block whether I will carry on with this method for all the shapes on the blocks on the other side, or to revert back to just using it for the grey leaf sections where it worked well.
Its been so long since we worked on Adeles quilt I forget how I stitched them.

Monday, 21 March 2011

W I P Black & White Quilt


 I started this quilt in February, but haven't taken any pictures till today.
My sister Theresa bought me a beautiful stack of black and white FQs for my birthday Last year, to make a quilt for myself. She saw me admire the fabric bundle at the creative stitches show and bought me it.

It has taken me so long to start it because I just couldn't make up my mind what I wanted to do with it.

A few years ago when I used to live in the country Theresa and I lived next door to each other in farm cottages. We spent many a winter evening by coal fires stitching and sharing ideas and fabrics.

One birthday she bought me this book
I have made and re made many of the lovely projects in this book and it has remained one of my favourites
We both worked on this quilt pattern from the book for her Daughter Adele.
A beautiful Rose of Sharon Quilt

It was a lovely pattern to work with, all hand appliqued.
There is a little bit about the original quilts (there were 4 of them)
all made by a mother and her sister for her 4 daughters.
If you click on this picture you can read it.


It was only quite recently when Theresa was mending the quilt for Adele that I remembered how I had enjoyed working on it so much and it was later on that evening that it struck me how beautiful this quilt would look with the black and white prints.
I couldn't wait to get started

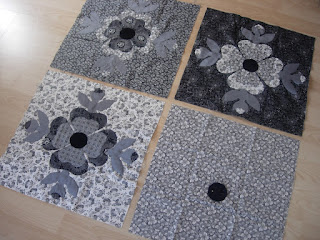
so far I have completed 3 blocks the quilt will have 4 blocks on each side. the centre circle is black velvet and I plan to get more velvet for the sashing and borders.


These are the rest of the blocks all cut out and ready to stitch.
Each square measures 17" the finished quilt size will be about 48"square.

 I will try to get a picture to show you, of the quilt we worked on together for Adele.

Sunday, 20 March 2011

Rosebud Floor cushion

Her tutorial is so well thought out and so easy to follow.
 I just had to make one....

I used a length of fabric that I had cut from some IKEA curtains you might recognise the fabric.

I made my own piping from some rat tail cord and some pretty floral print fabric from my stash...

I thought the french knots would add a girly feel and highlight the floral piping

I added a zip (one of 3 I purchased from eBay for a couple of pounds)
I wanted to be able remove the fiberfill to wash the cover. Charlotte helped me stuff the fiberfill which was reclaimed from a single quilt who's stitching had come undone, rendering it useless as a duvet but still usable for this cute project.
I calculated that this cost me less than £2 to make as I had almost everything that I needed.


French knots are my favourite embroidery stitch these did not take me as long as you might think.....

Beautiful variegated cotton Perle from DMC, One of my impulse purchases at the recent Creative Stitches show in Glasgow, not knowing what I was going to do with it, I just loved the colours, it was a perfect match for the flowery fabric!

and a perfect fit for Charlotte she loves the feel of the little rosebuds.
I'm so pleased with how it has turned out!

Saturday, 19 March 2011

Sunny & Bright!

More baby bunting
For Millie


another order from a friend........ in lovely sunny Yellows, reds & oranges!


These are not colours I usually choose to work with so I found it challenging

....but fun and now I have some lovely new colours added to my stash!


LinkWithin

Related Posts Plugin for WordPress, Blogger...