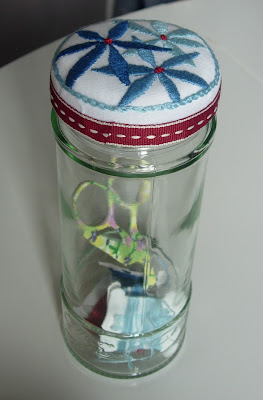
It's my birthday today,
I used to always have a gift to buy and give on my birthday too as I was born on my Dad's birthday.
He is resting in peace now, we said goodbye to him in Oct 2004, but he is never forgotten.
My birthday is always a reminder.
So in the true birthday spirit of giving ......I have made a little thing to share with you.
Embroidered Jar Lid Cover
I liked this jar, tall and slim, I thought it would be useful for storage in my studio but the black lid was a bit boring, my initial thought was to glue a paper cover on it, then I thought a fabric instead. Then I decided it would be a perfect little project for some hand embroidery.
My inspiration for the flower design came from the lovely book
The new crewel by Katherine Shaughnessy.
Although I did not use crewel wool or linen twill fabric as described in the book,
I liked the patern and the way the flower petals overlapped on some.
I used a piece of white cotton curtain lining and some DMC embroidery threads in 3 different shades of blues and a little bit of red rayon floss.
3 cotton wool pads
thin double sided tape
ribbon to edge.
embroidery hoop, needle, scissors
and a clean jar with lid (preferably one with a deep sided lid)
I haven't gave any measurements as jar sizes vary, and each one you do will be unique.
Keep your design simple and have fun.
1. Put you fabric into the hoop and lay face down on the table using a light pencil draw round the lid to leave a circle on the back side of your fabric.
2. Draw you flower outlines within the circle.
3. Embroider the flowers, I used 3 strands for flowers in satin stitch 1 strand red for french knots.
4. Chain stitch round the flowers using the circle on the back as your guide.
5. Stick a layer of double sided tape around the top edge of the lid.
6. Take the 3 cotton pads and gently tease them apart to fit the top of the lid.
7. Remove embroidery from hoop and trim off excess fabric leaving enough to cover the deep edge of the jar and a little over.
8. Place embroidery right side face down on the table with the cotton and lid centred on top, peel away backing tape.
9. Bring the fabric up matching the chain stitch edge with the lid top rim and press against the tape
10. Repeat on the opposite side to keep fabric centred
11. Repeat on the other two opposite sides.
12. The tape should allow some repositioning of your fabric until you are happy that the chain stitch edge is lining up to the lid edge.
13. It should look something like this.
14. Add another thin layer of double sided tape to the lower edge of the lid and peel backing tape away and press the lower fabric edge against it.
15. Trim away excess to lid edge.
16. Add another layer of double sided tape over the fabric this time around the bottom edge of the lid and cover with ribbon strip.
17. Secure edge with another little snippet of tape.
And there you have it......finished!
Of course the idea could be used to make a lid cover for any size lid,
it would be nice to see yours if you make one :)


HAppy birthday! It's a lovely little jar.
ReplyDeletea very happy belated birthday!!! all the best people are born in may!!
ReplyDeleteHappy birthday! Your embroidery is beautiful. If only there were more hours in the day to make all the wonderful things I see on blogs!!
ReplyDeleteBelated Birthday Greetings Yvonne! and what a lovely project to share with us :o) thankyou, I echo 'frayedattheedge'... the 'to-do' list just keeps growing with all the lovely little projects I see in blogland, but this one will be going on my 'must-do' list! :o)
ReplyDeleteYou do very pretty and neat work. Embroidery was the first needlecraft I learned as a teen. It's fun to see the design coming together.
ReplyDeleteOh, I`m late for congratulations! I hope you had a great day!
ReplyDeleteSilke